Showing posts with label Recipes. Show all posts
Over the weekend I made some homemade chicken soup and some homemade buns for soup and sandwich night. I've posted about the soup here, and I thought it was about time I posted my bun recipe. Using my hand-me-down and awesome bread maker, these buns are so easy to make and a weekly staple in our house. I've also used this bun recipe many times for dinner rolls, making 24 rolls instead of 12 buns.

Home Made Buns (adapted from Sanyo's The Home Bakery Book, 1988)

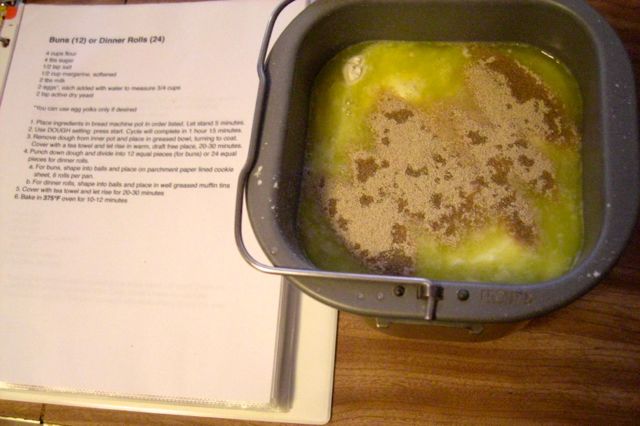
4 cups all purpose flour
4 tbsp sugar
1/2 tsp salt
1/2 cup margarine, softened
2 tbs milk
2 eggs, each added with water to measure 3/4 cups (or use yolk only, if desired)
2 tsp active dry yeast

1. Place ingredients in bread machine pot in order listed. Let stand 5 minutes. Use DOUGH setting and press start. Dough will be complete in 1 hour 15 minutes.


2. Remove dough from bread maker and place in a greased bowl, turning to coat.


3. Let rise 20-30 minutes.


4. Punch down dough and shape into 12 buns. I like to use a scale to get them all about the same size.


5. Let rise 20-30 minutes.


6. Bake at 375°F for 10-13 minutes.


Enjoy as part of a soup and sandwich combo for maximum enjoyment.


Posted by Jen B On Monday, October 27, 2014 9 comments
We have a had a lovely long weekend here, sunny, hot, and a little humid. I needed some cookies to take to a friend's house on Saturday and there was no way I could use the oven, so a no-bake treat was needed. I have posted about this no-bake cookie before, but I have since found my favourite recipe for them, which I am posting here today.

**Note About The Photos: I'm still getting used to my new camera and my kitchen photos came out very yellow. I need to tweak the settings some more and possibly use the flash more often than I did with my old camera. Learning as I go!!

Chocolate Oatmeal No Bake Cookies

Ingredients:
2 cups white sugar
1/2 cup milk
1/2 cup margarine
1/4 cup cocoa powder
1/2 cup peanut butter
1 tsp vanilla
3.5 cups rolled oats

Method:

1. Combine sugar, milk, and margarine in a medium saucepan and heat over medium heat until blended. Stir occasionally and bring to a boil.


2. Once boiling, continue to boil without stirring for 4-5 minutes.


3. Remove from heat. Whisk in cocoa powder until blended (be careful when stirring as liquid is very hot). Add peanut butter and vanilla and mix until smooth.


4. Stir in rolled oats.


5. Drop by spoonfuls onto lined cookie sheet (shaping them if desired). Allow to chill in the fridge for at least 1 hour.


Enjoy!!!

Posted by Jen B On Monday, September 01, 2014 5 comments
I got an excellent deal on chicken wings on Monday and John quickly made them into a mouth watering meal. He works without a recipe, so I'll give you a rough idea of what he did, but mainly he just sort of winged it. (Bad puns for the win!)

First he split the wings. We had 14 full wings which made 28 split. He put them in a bowl and sprinkled them with olive oil, pepper, and Montreal steak spice (our go-to spice mix).


He spread them on a baking sheet and cooked them at a high heat (450°F) until fully cooked (about 40 minutes), flipping once. 


Once fully cooked, he added the wings to a bowl for tossing.


John made an amazing spicy BBQ sauce for them that included: prepared hickory BBQ sauce, Sriracha sauce, vinegar, chili powder, and salt + pepper. Not sure of the exact amounts of each, but it was damn good! Here are the wings right after the sauce was added. Look at them steam! It had a wonderful smell.


We snacked on wings strait from the bowl while watching the Emmys Monday night. Quite fun. The coriander seeds from the Montreal steak spice added an amazing flavour to these crispy and saucy wings.

Posted by Jen B On Wednesday, August 27, 2014 8 comments
Summer BBQ's are great for catching up with friends and family, but they are even better for all the amazing food! We went to an over-the-top BBQ at Bryan and Betony's last weekend that went beyond typical hamburgers and hot dogs (though we ate those too). There were also crab legs, lobster, shrimp, corn bread, and some home cooked baked beans. All the food was delicious and I took my hamburger up a notch by topping it with baked beans. Yum! Betony shared the baked bean recipe, which turned out to be made with canned beans instead of dry. I had two cans of beans on hand so I made some up at home. They are easy and delicious (although they do take some time in the oven).

The recipe is Simple Baked Beans from allrecipes.com.

In a large bowl, mix together two cans baked beans,1/4 cup molasses, 1/4 cup chopped onion, 1/4 cup brown sugar, 1 tbs mustard, and 2 tbs ketchup. That's it.


Put mixture into well greased baking dish (I used an 8x8 disposable one). Cover and bake at 350°F for 3 hours.


The beans thicken up beautifully and have a really sweet and smoky flavour. They are also a bit sticky and little chewy which gives them a stick-to-your-ribs feel. I served them with a bacon and egg bagel for an epic breakfast-for-dinner. So good!


At some point I still want to try making these with dry beans, but this was a fun and easy first try at this yummy dish.
Posted by Jen B On Monday, August 25, 2014 7 comments
My friend Amanda recently posted that she made Poutine Pizza. The idea was so over the top and fun sounding that it was only a matter of time before I tried it.

For anyone who doesn't know, Poutine is the wonderful mixture of french fries, cheese curds, and gravy. Seems like an odd thing to put on a pizza, but believe me, it works. Gravy is substituted for the pizza sauce, so there is no confusion of flavours.

I used Amanda's recipe, but didn't go the authentic distance and pick up cheese curds - I just used mozzarella. We also used a poutine add-in, using some deli ham that we thought would taste great on the pizza.

Step 1. Cook up some gravy. I used a package of Poutine Gravy which made 2 cups.

Step 2. Pre-cook your french fries. We used strait cut fries from a bag.

Step 3. Press your favourite pizza dough (we used homemade) into a pizza pan. Add enough poutine gravy to cover dough (as the pizza sauce).


Step 4. Cover in shredded mozzarella. Add some chopped deli ham if desired. Bake for about 20 minutes at 425°F until dough is mostly cooked. 


Step 5. Remove pizza from oven and top with pre-cooked french fries. Spread more shredded mozzarella on top.


Step 6. Top with the rest of your poutine gravy and return to the oven for about 10 minutes (or to desired melty-ness of cheese). Broil for a few minutes to get cheese to bubble.


Poutine Pizza!!!!

This was a really fun treat night meal. It tasted like two amazing things: (1) poutine and (2) fresh rolls dipped in gravy. It was a delight! It was very filling, so we ended up with leftovers that weren't as good the next day. So this might be a great pizza for sharing.


Posted by Jen B On Tuesday, August 19, 2014 9 comments
I can't remember where I first saw zebra cake posted, but I do remember how fun and easy it looked to make. It had the zebra name because it was chocolate and vanilla cake baked together to look like the stripes of a zebra. I made one for fun a few months ago and I'm a sucker for any sort of surprise-inside cake, so I liked it. This time around I wanted to add some colour to it (pink!), which ended up looking like leopard print to me. I'm sure this cake could also be called marble too. Whatever you want to call it, it is a fun and tasty cake to bake.

Ingredients:
1 box white or yellow cake mix, prepared as per package directions.
            (sidenote: I always prepare cake mix with unsweetened applesauce instead of oil. It makes
             for a flavourful cake that has way less fat).
2 tbs cocoa powder
Food colour of choice (if desired)

Method:
1. Prepare cake batter and separate into two bowls. A box of cake mix will make roughly 5 cups, so I very roughly measured out 2.5 cups into a new bowl.

2. Add 2 tbs of cocoa powder to one bowl and stir to combine. Add food colouring to other bowl and stir to combine (or leave white if you want the zebra look).


3. Using a 1/4 cup measure, alternate batter into the center of greased cake pans. Just keep adding the batter to the center and gravity and the baking process will spread it all out for you. Check out this brief kitchen video I made that shows me alternating the colours:


4. Bake cake in 350°F oven. I used 8 inch round cake pans and the box suggested 26-31 minutes, but it actually took a little longer (about 38 min). I just kept checking every 3-5 minutes to see if a toothpick would come out clean. It finally did.

5. Frost and decorate to taste. I used a white frosting so that the inside would seem more surprising when cut open. The frosting I used was marshmallow buttercream (my favourite).


Once the cake was iced white I noticed I still had some buttercream leftover, so I added 1 tsp of cocoa powder to it and piped some designs along the top and bottom. Fancy eh?


Posted by Jen B On Tuesday, July 22, 2014 5 comments
This past Canada Day I was feeling festive and tried making butter tarts for the first time. I used some pre-made tart shells and Mom's recipe for the filling. They were delicious and really easy to make. They were the perfect addition to my Canada Day. I'm really excited to make these again - I just love them.

If you want to learn more about this fun little dessert, check out the Wikipedia page which has lots of great info.

Butter Tarts
1/2 cup brown sugar
1/4 cup corn syrup
3 tbsp soft butter
1 egg, beaten
1 tsp vanilla
1/8 tsp salt
1/2 cup pecans (or walnuts or raisins or nothing)
12 pre-made tart shells


Combine sugar, corn syrup and butter until mixed. Next add egg, vanilla, salt and pecans. Stir.


Place mixture into 12 tart shells, aiming for 2/3 full.


Bake at 425°F for 8 minutes. Lower temperature to 350°F and continue baking until filling is set and pastry is cooked, about 18 more minutes.


 Enjoy!!

Posted by Jen B On Thursday, July 10, 2014 6 comments
We've been off coffee since November and I have to say I haven't really missed it. I replaced my morning beverage with Green Tea and then realized I like Orange Pekoe too. Mom recently gave me a hand-me-down tea pot and some of my Nanny's old tea cups (with saucers) so now I'm not only a tea drinker but a fancy tea drinker to boot.

John likes tea too, but periodically has a craving for coffee and reminded me recently of some coffee mixes I made a long while back. I misplaced the recipe I originally used, but I'm pretty sure it's the same as or was the recipe found here.

Vanilla Coffee Mix (recipe is from here).
1/3 cup instant cofee
1 cup instant skim milk powder
1/2 cup coffee whitener
1/3 cup sugar
1/4 cup vanilla pudding mix

Mix all the ingredients in a blender and blend until mixed. I thought I would use my Magic Bullet to blend it, but I realized once I measured in all my ingredients that it was super full and probably wouldn't blend right (magic or no). It made for an awesome photo, though!


I used my stand up blender to blend, and it took 30 seconds at most. So quick and easy.

 
Add three tablespoons of mix to mug and just add hot water. Adjust to taste. We have big mugs (ha!) so we keep adding scoops until it tastes right.


Add whip cream and cinnamon sugar to top of your bevy if desired and enjoy!

Posted by Jen B On Wednesday, July 09, 2014 11 comments
I recently learned that I can easily make sweet potato puree and then substitute it in for any recipe calling for pumpkin puree. Sweet potato puree is incredibly easy to make and I always have sweet potatoes on hand, so I think it is going to be part of my life for the next while.

I have a giant bag of Craisins so I thought I would mix the two and make some breakfast muffins.


This recipe is slightly adjusted from a recipe found here.

Ingredients:
2 cups flour
3/4 cup sugar
1 tbs baking powder
1 tbs pumpkin spice
1/4 tsp salt
1 cup sweet potato puree (about 2 small sweet potatoes)
1/2 cup applesauce
2 eggs
1 cup sweetened dried cranberries

Method:
1. In large bowl, mix flour, sugar, baking powder, pumpkin spice, and salt.

2. In a separate bowl, mix sweet potato puree, applesauce, and eggs until mixed. Add cranberries.


3. Add wet mixture to dry mixture and stir until just moistened. Divide batter into 12 muffin cups.


4. Bake at 400°F for 20 to 25 minutes or until a toothpick comes out clean.


Suggested Serving: pair the muffin with your favourite warm beverage.


Posted by Jen B On Tuesday, April 29, 2014 2 comments
Related Posts with Thumbnails
  • RSS
  • Delicious
  • Digg
  • Facebook
  • Twitter
  • Linkedin
  • Youtube

My Adorable Twitter

Let's connect!

What I'm Currently Reading

2015 Reading Challenge

2015 Reading Challenge
Jen has read 0 books toward her goal of 30 books.
hide

2014 Reading Challenge

2014 Reading Challenge
Jen has read 0 books toward her goal of 25 books.
hide

2013 Reading Challenge

2013 Reading Challenge
Jen has read 5 books toward a goal of 25 books.
hide

Suggested Reading

Suggested Reading

Good Eating

Active and Outdoorsy