Showing posts with label How To. Show all posts
I first got excited about chocolate cupcake toppers while reading Sugar Swings, and seeing her amazing superhero toppers. With the Blue Jays winning the American League East, I was encouraged to try making some of my own, choosing the Jays logo (and their maple leaf logo) as my toppers.

Cookies, Cupcakes, and Cardio has an amazing tutorial on how to pipe chocolate (candy melts) onto a design for cupcake toppers and watching this video gave me the confidence to go for it.


When piping chocolate designs, make sure you have an image that looks the same when reversed, or make sure you reverse your image so the design is backwards. You want the design backwards because the finished topper is flipped over, as the flip side is flat and looks a lot nicer than the piped chocolate side. I previously made numbers for a birthday cake, and you can see that example here. For the Blue Jays logo, I googled an image of it and then flipped it horizontally before printing it out. The maple leaf logo looks the same on the reverse side, so I didn't need to flip it.

To start, I printed out a number of pages of designs and taped them to the table.


Then I covered the pages with parchment paper and taped it to the table too.


Using piping bags filled with the four colours of the logo, I piped one colour at a time, waiting about ten minutes for each colour to dry. First I did the white outline of the logo, then the red maple leaf, then the light blue, and finally the dark blue. I didn't take photos of the process, because I always forget to capture what I'm doing while I'm doing it. #bloggerproblems

Here are all the chocolate colours piped onto the design.


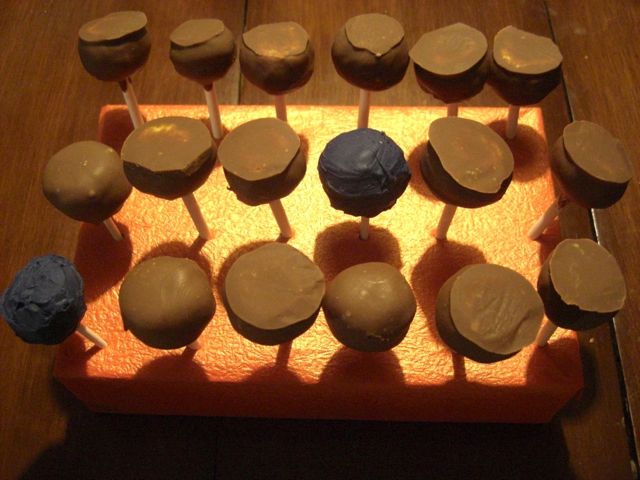
Next, I very gently flipped them to the reverse, flat side.


Finally I piped some buttercream onto cooled cupcakes and placed my toppers on top.


Go Jays Go!

Posted by Jen B On Wednesday, October 14, 2015 2 comments
My farmer brother raised chickens again this year, and last week we bought four of them. Each of the chickens weighed between five and five and a half pounds, so perfect for roasting. Even though roast chicken dinner is fantastic, I decided I wanted more meal options from all these birds. I took to Google and set out to learn how to cut up a whole chicken. It seemed easier than I thought, so I was really excited to try it.

I learned how to divide chicken by watching this short YouTube video. I watched it about five times before I took to work on my chickens.


On chicken day, I successfully parted three chickens. The first one took about twenty minutes (maybe longer), as I figured out how the joints worked and the correct angle for the knife. I had the YouTube video called up on my iPod, so I could learn step by step as I worked (while frequently washing my hands). My first attempt wasn't perfect, but it helped me learn for the next one. The second chicken was far easier to part, taking about half the time as I got the hang of it. By the third chicken I was full speed and the breast pieces looked like they were from the grocery store. I was so happy and so proud of myself! Kitchen skills!

From my three chickens I got the following for the freezer:

2-pack of chicken legs x 3

2-pack of chicken breasts x 3

12 (split) chicken wings

3 chicken backs for soup stock

I also kept one of my chickens whole, so we can have a roast chicken one night too. Very excited.


Posted by Jen B On Wednesday, August 19, 2015 7 comments

I was craving mint and chocolate so I made some chocolate cupcakes and swirled chocolate and peppermint buttercream for the decoration. I'd heard about the technique a few years ago, but never tried it because it requires three piping bags, and I don't usually have that many on hand. I got an 8-pack of them for Christmas, so now was a great time to give them a go.

I did a Youtube search and found a quick video that shows the basics of how to swirl the icing.


I made a small batch of butter cream frosting and divided it into two bowls, so I could make one half chocolate and the other mint. For the chocolate I added cocoa powder and vanilla, and for the mint I added green food colouring and peppermint extract. I ended up with about a cup of each flavour. The best part about making two kinds of icing is that there are twice as many beaters/bowls/and spoons to lick. I highly recommend swirl cupcakes for this bonus alone.

I put each colour in a piping bag and tied an elastic around the top.


Then I cut off the tips of the piping bags, and placed them side by side in a third piping bag, with a coupler and a 1M tip.


Then I just decorated like normal and got a very fun result.


The mint and the chocolate were amazing in swirl form. One bite was minty chocolate, another bite was chocolatey mint. Really fantastic. I would definitely try the swirl method again and am already thinking about fun flavour/colour combos for next time.

Posted by Jen B On Monday, March 23, 2015 8 comments
I needed a number "3" cookie cutter for the rainbow cake I decorated from yesterday's post. As my entire collection of cookie cutters (as posted about here) is new (and does not contain any numbers), I decided to make my own cookie cutter using aluminum foil as I've done here and here.

I originally learned how to make the cookie cutters from this blog tutorial.

Meterials Used:
• Aluminum foil
• Printed design for cookie cutter (could also be drawn)
• Measuring tape

I needed a "3" so I printed a nice looking one that was the size I wanted.  This "3" was 4" tall and 2.75" wide.

I measured the length of the design (using a sewing tape measure) so I would know how much aluminum foil I would need. The "3" I chose measured about 17.5" long.


I took out a piece of aluminum foil that measured 35"; twice as long as my design, as the first thing you do is fold the aluminum foil in half length wise.

35 inches long
Folded in half lengthwise - now 17.5 inches long

Next, it is folded in half height-wise about 5 times, until it is about 1/2" thick.


Next, trace your long strip of folded tin foil around your cookie cutter design.


Where the ends meet up, join them together. I used a small amount of glue to fasten them.

And there you have it! You're very own homemade cookie cutter!


The finished cookie cutter was a little bigger than my printout, but that actually suited me just fine. The finished measurement was 4.75" tall by 2.75" wide.

I love making the homemade cookie cutters, because they allow me to get a very specific, large sized cookie cutter, for just the cost of aluminum foil (this one has about eleven cents worth of foil in it). They are also recyclable if there is no need to use it again. All around, pretty great. And this one helped me decorate an awesome cake!


Posted by Jen B On Wednesday, December 17, 2014 3 comments

Our friend's daughter turned three over the weekend and she had a rainbow themed birthday party. Because my friend knows I love making rainbow baked goods, I got tapped to make the cake and some cupcakes. I was pretty excited about it and decided to make some fun cupcake toppers (I got to use my glue gun!). I'd never made them or used them before, but now I'm totally in love with them, and am obsessed with all wonderful things I am going to top my cupcakes with. Seriously, any excuse to use my glue gun!

I have a lot of scrapbooking supplies, so this craft was pretty easy to create.

First I punched some 1 1/2" stars using card stock in rainbow colours (red, yellow, green, blue). Then I punched some 1 1/4" stars in white card stock. I free hand wrote the number 3 (the birthday girl's age), in coordinating colours on the white stars.


Next I used a glue stick to stick all the numbered stars to the colourful stars.

Using regular toothpicks, I used my glue gun (so fun!) to adhere the stars to the toothpicks.


These were simple and fun to make and were a festive addition to the cupcakes.


Posted by Jen B On Monday, December 15, 2014 4 comments
I can't remember where I first saw zebra cake posted, but I do remember how fun and easy it looked to make. It had the zebra name because it was chocolate and vanilla cake baked together to look like the stripes of a zebra. I made one for fun a few months ago and I'm a sucker for any sort of surprise-inside cake, so I liked it. This time around I wanted to add some colour to it (pink!), which ended up looking like leopard print to me. I'm sure this cake could also be called marble too. Whatever you want to call it, it is a fun and tasty cake to bake.

Ingredients:
1 box white or yellow cake mix, prepared as per package directions.
            (sidenote: I always prepare cake mix with unsweetened applesauce instead of oil. It makes
             for a flavourful cake that has way less fat).
2 tbs cocoa powder
Food colour of choice (if desired)

Method:
1. Prepare cake batter and separate into two bowls. A box of cake mix will make roughly 5 cups, so I very roughly measured out 2.5 cups into a new bowl.

2. Add 2 tbs of cocoa powder to one bowl and stir to combine. Add food colouring to other bowl and stir to combine (or leave white if you want the zebra look).


3. Using a 1/4 cup measure, alternate batter into the center of greased cake pans. Just keep adding the batter to the center and gravity and the baking process will spread it all out for you. Check out this brief kitchen video I made that shows me alternating the colours:


4. Bake cake in 350°F oven. I used 8 inch round cake pans and the box suggested 26-31 minutes, but it actually took a little longer (about 38 min). I just kept checking every 3-5 minutes to see if a toothpick would come out clean. It finally did.

5. Frost and decorate to taste. I used a white frosting so that the inside would seem more surprising when cut open. The frosting I used was marshmallow buttercream (my favourite).


Once the cake was iced white I noticed I still had some buttercream leftover, so I added 1 tsp of cocoa powder to it and piped some designs along the top and bottom. Fancy eh?


Posted by Jen B On Tuesday, July 22, 2014 5 comments
A few years ago, my Grandma explained to me all about checking gauge before starting a knitting project. And despite this passed down knowledge about gauge, I never tried it. I just haven't attempted a project where the gauge really mattered to me.

It's freezing cold this winter and I want to knit myself a balaclava. I found a pattern at my skill level and set about to make it. The pattern suggested chunky yarn, so I picked up some chunky yarn. Turns out there are different sizes of chunky, and the pattern calls for "5" (bulky) and I got "6" (super bulky). I wasn't sure if the super bulky yarn would still work on the suggested needle size, so this was an opportunity for me to test the gauge.

First step was to knit a swatch. I didn't time it, but I think it took about an hour to knit. Spending an hour on something I'm going to rip out anyway seems tedious, but if it saves me making a whole project that I have to rip out (because it's too small or too big) it's totally worth it. I didn't cast off my swatch, as I will just pull out the knitting and re-use it for my actually project.


Next I watched this video about checking gauge.


Then I used the "Knit-Chek" tool I bought three years ago but never used. The pattern called for 4 stitches + 5 rows = 1 inch.

Here is how mine measured up:


So it looks like I met gauge, which means I could proceed with these needles and this yarn and my project should turn out the proper size.

The swatch was also helpful for me to get an idea of what the end project will look/feel like. And in this case, I think the yarn is too thick and the knitting is too tight for it to be a comfortable and breathable balaclava. I held the swatch over my nose and mouth, and I am able to breathe through it, but I think I would prefer a little more space between the stitches. So I am going to switch gears and use this yarn for slippers or slipper socks, as I think this yarn would be perfect for them. It feels really warm.

So my first try at testing gauge was a success. I got an idea of the finished project and that helped me decide whether to proceed or not. My balaclava project is on hold, but now I'm super excited to find a slipper pattern!


Posted by Jen B On Thursday, January 23, 2014 10 comments
I have been playing RPGs pretty regularly this year. Or I should say, as regularly as six adult schedules will allow. We played a continuing story over most of the sessions, with our characters slowly advancing in level. We also did a one off game where I was already high level and got to use a bow that shot four arrows at once. That was pretty cool.

I generally like to bake something for our gaming nights, and this week I finally made D20 dice cookies. After watching the Nerdy Nummies tutorial earlier this summer, I knew they were something that would eventually happen in my kitchen.

The D20 dice cookie requires a hexagon cookie cutter, but I couldn't find that shape at our baking supply store. I found a home made cookie cutter tutorial online, that used folded aluminum foil to make the shapes. I gave it a try and many folds later, I had myself a 5 inch hexagon cookie cutter.


Using a sugar cookie mix, I made the dough and sectioned it into three so I could dye it multiple colours. D&D dice are usually multi-coloured, so I wanted my cookies to be that too.


I rolled the dough to 1/4 inch thickness and used my home made cookie cutter to make the cookies. It made giant cookies! I was happy, as I wanted them nice and big so I could easily decorate them.


Using prepared royal icing, I sectioned my cookie faces into triangles and filled the triangles with numbers. 20 was always in the center. I only had enough dough to make 7 cookies. But they were 7 giant cookies, so that was okay.


These cookies were super fun to make, but the best part was sharing them with my gaming buddies. My friend Bryan took this action shot of his cookie while we were rolling up our characters.


Posted by Jen B On Tuesday, December 10, 2013 4 comments
Cake pops are delicious, fun to eat, and a hit at parties (who doesn't love eating food on a stick?). I've made them five or six times over the past few years, and each time I've been rewarded with around 50 cake pops. They are best for sharing, as that is a lot of cake on a stick!

The idea of cake pops is simple: mix baked cake with icing and form into balls. Add a lollipop stick. Dip balls into chocolate or candy melts, set, and enjoy. The pros can make them look like any shape, but as a cake pop amateur, I tend to sick to a plain old ball on a stick.

The first few batches I made were balls on a stick + melted chocolate chips + sprinkles.


Next batch, I played with the colour of the cake/icing to make them more festive inside.


Earlier this year, I tried making heart shaped cake pops, and they (mostly) turned out, but it was a lot more challenging.


Recently I made them again for my friend Jen's birthday. It was a team effort. I made plain ones (no sprinkles) and then she decorated them.

Dipped cake pops
Cake pops with my friend Jen's spooky decorating
In my most recent adventure in cake pop making I realized a few things:

(1) I hate making 50 cake pops at a time. Rolling the balls is fun, but dipping 50 balls on a stick into chocolate is tedious. From now on I am only making half batches (I want baking to be fun - and 25 cake pops is still a lot of cake pops!).

(2) I haven't figured out candy melts and find them really difficult to work with. Every cake pop I coat with the candy melts cracks, and I find they aren't as fluid as melted chocolate chips. Now, obviously they work for other people, so there is just some part of the technique I am missing. Currently I'm not patient enough to learn how to make them work, so I'm giving up on using them for now. Chocolate chips do the job, so I am going to stick with them.

From here on out, my goal is to keep cake pops fun. They really do taste fantastic and I don't want some minor frustrations to keep them off my baking list.

Posted by Jen B On Monday, November 18, 2013 6 comments
Related Posts with Thumbnails
  • RSS
  • Delicious
  • Digg
  • Facebook
  • Twitter
  • Linkedin
  • Youtube

My Adorable Twitter

Let's connect!

What I'm Currently Reading

2015 Reading Challenge

2015 Reading Challenge
Jen has read 0 books toward her goal of 30 books.
hide

2014 Reading Challenge

2014 Reading Challenge
Jen has read 0 books toward her goal of 25 books.
hide

2013 Reading Challenge

2013 Reading Challenge
Jen has read 5 books toward a goal of 25 books.
hide

Suggested Reading

Suggested Reading

Good Eating

Active and Outdoorsy