Showing posts with label Projects. Show all posts
I've been working through the patterns in the Knitted Toy Tales book, having totally finished a fish and finished the knitting for a teddy bear and an elephant.


This new pile of finished knitting is going to be a cute little penguin.


Now that I have my giant bag of stuffing, I am going to spend some time this summer putting all these toys together.


Posted by Jen B On Monday, June 29, 2015 4 comments
I have gotten into knitting toys lately, and one of my favourite things to do is search through the endless amounts of patterns on Ravelry for something cool to knit. I could spend hours on there just looking...so many patterns, so little time. I found a pattern for a Minion toy, which would make a perfect gift for my Mom (her kids are all grown up - she needs Minions!). The pattern included a photo tutorial, so it was a great project to start and complete pretty quickly.

The pattern can be found here.

For this pattern I had to 'pick up stitches' to make the Minion's overalls, something I had never done before. I found a video that showed me how to do it, and marveled at how amazing the internet is. I love that there are so many teachers out there who are happy to share their knowledge. It is the best!

This was a fun toy to make and Mom just loves it. I'm going to make a two-eyed Minion as well, so this one will have a buddy. So much fun!


Posted by Jen B On Wednesday, June 10, 2015 4 comments
I started making some knitted toys earlier this year, then got delayed because I didn't have any stuffing to complete them. There was a bag of it around here somewhere, but after much searching I declared it officially lost.

Thanks to my Mom I am no longer stuffing free. She surprised me on a recent visit with a giant bag of it. I'm not kidding when I say giant, it is GIANT. It weighs 4lbs, and stuffing is pretty light, so that is a lot of stuffing. I will have trouble losing this one. haha!

I put the fish toy I made on the bag to showcase just how much stuffing there is and how many toys I could potentially make with it. I better get knitting!


Posted by Jen B On Wednesday, June 03, 2015 3 comments
I keep returning to my Knitted Toy Tales pattern book and having so much fun creating cute things. The pieces for the toys are quick knits, so it's easy to get from start to finish on a project.

Since completing my toy fish, I've started working on a teddy bear and an elephant. I have finished all the knitting work for the teddy bear and just need to stuff him and sew him together.

For the elephant toy, I have completed the knitting for the body, the tusks, and two of the legs. Only a few things left to knit and then I can stuff him and sew him together.
 
My delay in finishing these toys is my lack of stuffing. I know I had a bag of it a few years ago, but I've hidden it on myself exceptionally well. We did two thorough searches of the house, and eventually found the tote I was sure it was in, and came up empty. I have accepted that my bag of stuffing is lost and that I have to get a new one, I just haven't gotten around to it yet. So these toys are a work in progress, but I'm looking forward to putting them all together soon.

Posted by Jen B On Wednesday, March 04, 2015 3 comments
My Mother-in-law had a birthday recently and we celebrated with a carrot cake with cream cheese frosting. It is her favourite cake and I am always up for making desserts with cream cheese, as I absolutely love how it tastes in sweets. I don't bake with it very often (it can be expensive when not on sale) but other treats I've enjoyed are: pumpkin cream cheese frosting, cream cheese cinnamon buns, Oreo truffles, and peanut butter truffles.

I used a cake mix for the carrot cake, but I put it in three pans instead of two, as multi-layer cakes are so much fun.


There are loads of cream cheese frosting recipes online, all with varying ratios of cream cheese to icing sugar. One recipe suggested 1 package of cream cheese to 4 cups of icing sugar. Another suggested 2 packages of cream cheese to 2 cups of icing sugar. It was really all over the place. I didn't follow any one recipe, I just keep adding icing sugar until I thought it reached peak taste.

Cream Cheese Frosting
1 package cream cheese (250g), at room temperature for 1 hour
1/2 cup butter (113g), at room temperature
2 1/4 cups icing sugar

Some recipes add vanilla or lemon juice, but I didn't bother adding either, as it tasted so damn good as is. The thing I find deceptive about cream cheese treats, is they don't really taste sweet to me, which makes them incredibly easy to eat. I frequently had to get a new spoon, as I kept licking the one I was working with. With normal buttecream or marshmallow buttercream, I freeze any leftovers and make it into candies. The leftovers for this cream cheese frosting all went into my mouth. I was not shy about eating it at all.


I made some simple carrot decorations for the top of the cake, using ziploc bags to pipe on the frosting.

This cake was very yummy, and I love the three layers. I think it looks lovely.


Posted by Jen B On Monday, March 02, 2015 7 comments
I finished my first knit toy from the Knitted Toy Tales pattern book. I knit this adorable little fish and love having him swimming around the house. This pattern allowed me to learn new skills (intarsia and fair isle) and have a cute finished project in a short period of time.

Once the main body knitting was complete, I did duplicate stitch over the colour mistake in the tail fin (which ended up looking pretty great). Next I stuffed and seamed the body, bringing him to life. I knit and sewed on some fins, and embroidered on his little eyes. I love the way he looks.


Posted by Jen B On Wednesday, February 25, 2015 6 comments
I'm knitting a toy fish from my Knitted Toy Tales pattern book, and last week I showed you the intarsia colourwork I did for the tail fin. The body of the fish uses the Fair Isle technique, which I was excited to try as well.

My grandma recently gave me some yarn bobbins, and because this pattern only needed a small amount of yarn, I decided to use them for this project.


This was my first try at knitting a pattern with fair isle and it was really quite simple to do. In this technique, the different colours of yarn are carried across the back of your work, even when you aren't knitting with them. For this pattern, I used green and pink yarn to make the fair isle pattern.


Because the yarn is being carried, strands of colour are created at the back of the work. I Googled what the back side of fair isle is supposed to look like, and I think I nailed it.


Working on this toy has been perfect for learning some new knitting skills. Getting acquainted with intarsia and fair isle colourwork has been both challenging and fun. There are lots of possibilities for colourful projects in my future.


My little fish toy is almost complete. Next week I'll show you him all put together!


Posted by Jen B On Wednesday, February 18, 2015 6 comments
I began working a pattern out of my new knitting pattern book: Knitted Toy Tales. I decided to make a toy fish, as it involved some colourwork, which I am not very familiar with. I find small projects great for learning new skills as you can see your results (and learn from your mistakes) quickly.

The tail fin of the fish used a technique called 
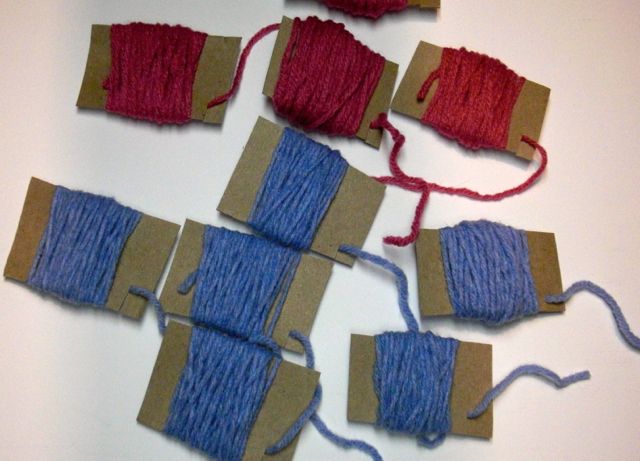
Intarsia. With intarsia, if there are multiple colours to be used throughout a row of knitting, each colour will have its own ball to work from. The fish toy didn't require very much yarn, so I placed my colours on bobbins. I didn't have enough 'real' bobbins for this pattern, so I made my own using some cardboard.


Following the pattern, I started with blue and knit in stockinette stitch until it was time for the colour changes. Because the fish would eventually be folded in half and seamed, the tail went from blue (colour A) to pink (colour B), to blue, to pink, to blue, to pink, to blue, to pink, to blue.


It took me a few rows to get used to having all the bobbins hanging off the work, but it eventually felt comfortable. I also had to make sure I crossed the yarns properly when changing colours, so I didn't leave any holes in the work. Once I learned the process, it actually started to be a lot of fun and I got into a pretty good rhythm of knowing what colour came next.


That rhythm helped me to (almost) notice a mistake in one of the rows of the written pattern. I knew something was wrong, but I couldn't quite figure out what was supposed to be right, and I wasn't 100% confident that I was right in thinking that it was wrong. So I knit it as it was written, thinking that seeing the result would let me know for sure if there was a problem or not. There was.


Once I was sure it was a mistake, I was able to figure out where the pattern went wrong. It is a little out of context, but I will try to illustrate the difference between the written pattern and what I believe should be the correct pattern. For the pattern blue is A and pink is B.

Original     Row 9: [A k2, B skpo, k1, k2tog, k2, A skpo, k1, k2tog, k2] rep to end of row.
Corrected  Row 9: [A k2, B skpo, k1, k2tog, A k2, B skpo, k1, k2tog, A k2] rep to end of row.

The original pattern had all the right knitting, but the wrong colour indicated (the original said to change the colour 3 times, the corrected changes the colour 5 times).

I knitted the mistake into my project, and didn't bother pulling back the rows of intarsia to get it out. I was using this toy to practice skills, so I didn't need it to be perfect. When the knitting was complete, I used duplicate stitch to cover the wrong blues with pink, and the wrong pinks with blue. The mistake is barely noticeable in the finished fish tail.

The main body of the fish uses Fair Isle colourwork, which I'll post about next week.

Posted by Jen B On Wednesday, February 11, 2015 4 comments
I have been collecting Wilton decorating tips over the past few years, buying them one at a time as I need them/want to play with them. I am building my collection slowly (I currently only have six decorating tips) but the ones I have are ones I use often/look forward to using more often.

These are the most recent additions to my collection and some photos of the fun I've had with them.

1A tip (Large Round).
I bought this one so I could make some hi-hat cupcakes. I definitely want to try the peanut butter ones from this blog, as they look decadent and insane (more icing than cupcake!) but I haven't found an opportunity to make them yet.

Just fooling around with some Marshmallow buttercream, I practiced making some 1A swirls.


2D tip (Drop Flower).

This one is similar to my 1M tip, which is my go to tip for decorating cupcakes. I did some practicing with this one that involved playing with colour as well. I put a few lines of colour on the inside of a piping bag with a toothpick, which gave the edges of the frosting a simple but fancy look.


#233 (Grass tip).
There are a number of different projects I want to try with this tip, from a hobbit hole cake to monsters (Elmo or Cookie). When baseball season comes around again, I'd also love to make a batch of these baseball cupcakes. This was my first go at making grass - I was very happy with it!


My current collection:

Back Row:  1M,   1A,   2D
Front Row:  #21,   #233,   #3


Posted by Jen B On Monday, February 02, 2015 4 comments
I have a feeling 2015 is going to involve a lot of knitting. My grandma recently gave me about thirty balls of yarn from her stash, and my friend Bryan's Mom just sent over a knitting pattern book and a bag of yarn to go with it. Fun!

The pattern book Norma sent over is called 'Knitted Toy Tales' by Laura Long. Most of the patterns are for small/medium sized toys that are knitted flat, so I can easily dive into this book and make some cute things. I am pretty excited about it.


She also sent over a bag of yarn that included some pretty pink sparkle baby yarn, and it immediately caught my eye. There were five 50g balls in the bag, and I spent some time searching Ravelry to see how I could use them up.


A baby blanket seemed like the obvious choice, and since many of my friends are having babies, a blanket could become a nice gift for a newborn. I looked through some patterns and found one that used circular knitting needles to complete the blanket. I had the right size and length (32" long!), as the blanket is pretty wide and would not fit on strait needles. This is my first try at knitting with circular needles, and I'm knitting strait on them, so I'm getting used to them pretty easily.


The thing I'm realizing about this pattern is that it will not be a quick knit. I'm still getting used to the way circulars work (and how certain stitches slide from the wire to the needle a little less easily than others). The pattern also has a complicated row that helps to form a Feather and Fan pattern, which involves me doing a lot of counting. Also each row has 154 stitches, so a knit row takes me over ten minutes to complete, a complex row takes over fifteen. The final length of the blanket will be 204 rows, so it is going to take me some time to get there. It's also not the kind of pattern that I can zone out to TV or an audiobook, so it will be a small doses kind of project. Even though it'll be months before this turns into a blanket, I think it will be a very satisfying knit once complete.

The first 12 of 204 rows.


Posted by Jen B On Wednesday, January 28, 2015 6 comments
There were two results from the cookie decorating party with my niece and nephew. The first, was family fun time that produced 25 awesomely decorated cookies.  The second, was that I got super sick with a cold (courtesy of my niece, who has only figured out not to sneeze or cough directly on other people 3 out of every 5 times).

I sent all the cookies home with the kids, so I might have to make some more before the new year. They look like a lot of fun to eat!

Aunt Jenny's cookies:

Earl's cookies:
Liz's cookies:
All the cookies:

Posted by Jen B On Friday, December 26, 2014 4 comments
I needed a number "3" cookie cutter for the rainbow cake I decorated from yesterday's post. As my entire collection of cookie cutters (as posted about here) is new (and does not contain any numbers), I decided to make my own cookie cutter using aluminum foil as I've done here and here.

I originally learned how to make the cookie cutters from this blog tutorial.

Meterials Used:
• Aluminum foil
• Printed design for cookie cutter (could also be drawn)
• Measuring tape

I needed a "3" so I printed a nice looking one that was the size I wanted.  This "3" was 4" tall and 2.75" wide.

I measured the length of the design (using a sewing tape measure) so I would know how much aluminum foil I would need. The "3" I chose measured about 17.5" long.


I took out a piece of aluminum foil that measured 35"; twice as long as my design, as the first thing you do is fold the aluminum foil in half length wise.

35 inches long
Folded in half lengthwise - now 17.5 inches long

Next, it is folded in half height-wise about 5 times, until it is about 1/2" thick.


Next, trace your long strip of folded tin foil around your cookie cutter design.


Where the ends meet up, join them together. I used a small amount of glue to fasten them.

And there you have it! You're very own homemade cookie cutter!


The finished cookie cutter was a little bigger than my printout, but that actually suited me just fine. The finished measurement was 4.75" tall by 2.75" wide.

I love making the homemade cookie cutters, because they allow me to get a very specific, large sized cookie cutter, for just the cost of aluminum foil (this one has about eleven cents worth of foil in it). They are also recyclable if there is no need to use it again. All around, pretty great. And this one helped me decorate an awesome cake!


Posted by Jen B On Wednesday, December 17, 2014 3 comments
Related Posts with Thumbnails
  • RSS
  • Delicious
  • Digg
  • Facebook
  • Twitter
  • Linkedin
  • Youtube

My Adorable Twitter

Let's connect!

What I'm Currently Reading

2015 Reading Challenge

2015 Reading Challenge
Jen has read 0 books toward her goal of 30 books.
hide

2014 Reading Challenge

2014 Reading Challenge
Jen has read 0 books toward her goal of 25 books.
hide

2013 Reading Challenge

2013 Reading Challenge
Jen has read 5 books toward a goal of 25 books.
hide

Suggested Reading

Suggested Reading

Good Eating

Active and Outdoorsy