Showing posts with label Baking. Show all posts

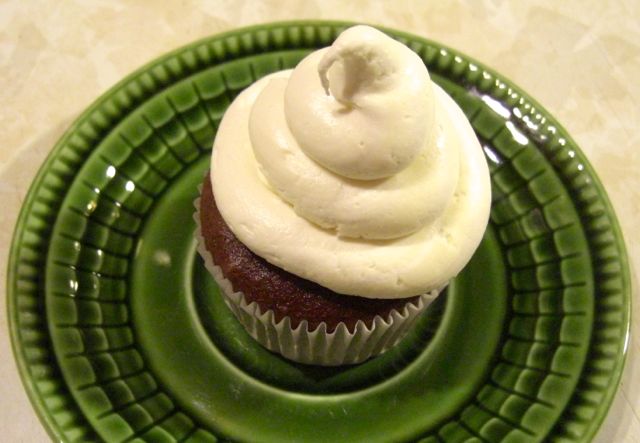
I was craving mint and chocolate so I made some chocolate cupcakes and swirled chocolate and peppermint buttercream for the decoration. I'd heard about the technique a few years ago, but never tried it because it requires three piping bags, and I don't usually have that many on hand. I got an 8-pack of them for Christmas, so now was a great time to give them a go.

I did a Youtube search and found a quick video that shows the basics of how to swirl the icing.


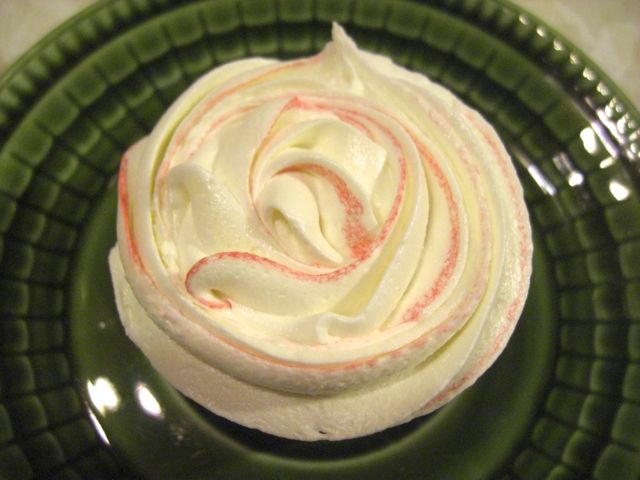
I made a small batch of butter cream frosting and divided it into two bowls, so I could make one half chocolate and the other mint. For the chocolate I added cocoa powder and vanilla, and for the mint I added green food colouring and peppermint extract. I ended up with about a cup of each flavour. The best part about making two kinds of icing is that there are twice as many beaters/bowls/and spoons to lick. I highly recommend swirl cupcakes for this bonus alone.

I put each colour in a piping bag and tied an elastic around the top.


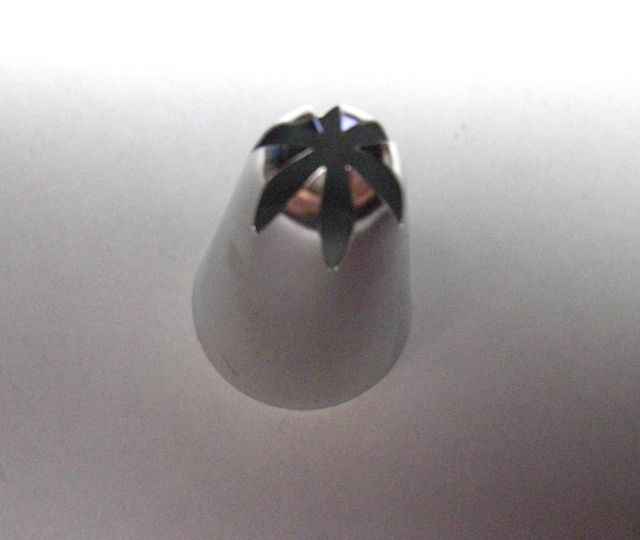
Then I cut off the tips of the piping bags, and placed them side by side in a third piping bag, with a coupler and a 1M tip.


Then I just decorated like normal and got a very fun result.


The mint and the chocolate were amazing in swirl form. One bite was minty chocolate, another bite was chocolatey mint. Really fantastic. I would definitely try the swirl method again and am already thinking about fun flavour/colour combos for next time.

Posted by Jen B On Monday, March 23, 2015 8 comments
There were two overripe bananas on the table the other day, and my normal practice is to put them in the freezer and save them until there's enough to make a couple loaves of my Mom's banana bread. I hadn't had banana bread in a while and decided I didn't want to wait and converted the recipe amounts in order to make a half dozen muffins.

I've altered Mom's recipe a tiny bit over the years (I use applesauce instead of melted butter), and the following is my version of the recipe.


Banana Bread Muffins (makes approx. 7)
Ingredients:
{Wet}
2 ripe bananas, mashed
1/2 cup brown sugar
2 tbs applesauce
1 egg
{Dry}
3/4 cup flour
1/4 tsp salt
1/2 tsp baking soda

Mix all wet ingredients in a bowl. In a separate bowl, mix all dry ingredients. Add dry ingredients to wet and stir until mixed. Fill muffin cups to about 2/3 full. Bake at 350°F for 25 minutes.


Enjoy!!

Posted by Jen B On Monday, March 16, 2015 6 comments
My mom recently reminded me of upside down cake. When we were kids she would make peach or pineapple upside down cake, and the fruit was always surrounded by a generous layer of crispy brown sugar topping. I'm not a fan of a lot of fruits (I have a texture thing) and I'm especially not a fan of fruit in cake (except for banana cake/bread. Don't try to figure me out!). I'm sure assorted fruits in cakes taste wonderful, but I don't like when my cake has things in it. It is silly, but there you go. When mom would make her upside down cakes, I would sneak the brown sugar bits off the top and not actually eat the gross fruit/cake. I was/am picky.

Well, I'm an adult now, and when mom reminded me of fruit upside down cake, I decided I would give it a try, but leave out the fruit. Following this recipe, I added some melted butter to a 9x13 cake pan, covered it in a bunch of brown sugar, and then poured a cake on top of it. I baked it, and flipped it over and out onto a cookie sheet. At this point I realized something was amiss, as the brown sugar wasn't as caramelized and stuck to the cake as I wanted. It's possible the fruit had a purpose that I didn't compensate for (maybe it adds liquid while baking).

So the top of the cake was a little crunchier than I expected, but it tasted pretty great. The nice thing about this cake is the topping replaces having to ice it. Easy.


Posted by Jen B On Wednesday, March 11, 2015 6 comments
My Mother-in-law had a birthday recently and we celebrated with a carrot cake with cream cheese frosting. It is her favourite cake and I am always up for making desserts with cream cheese, as I absolutely love how it tastes in sweets. I don't bake with it very often (it can be expensive when not on sale) but other treats I've enjoyed are: pumpkin cream cheese frosting, cream cheese cinnamon buns, Oreo truffles, and peanut butter truffles.

I used a cake mix for the carrot cake, but I put it in three pans instead of two, as multi-layer cakes are so much fun.


There are loads of cream cheese frosting recipes online, all with varying ratios of cream cheese to icing sugar. One recipe suggested 1 package of cream cheese to 4 cups of icing sugar. Another suggested 2 packages of cream cheese to 2 cups of icing sugar. It was really all over the place. I didn't follow any one recipe, I just keep adding icing sugar until I thought it reached peak taste.

Cream Cheese Frosting
1 package cream cheese (250g), at room temperature for 1 hour
1/2 cup butter (113g), at room temperature
2 1/4 cups icing sugar

Some recipes add vanilla or lemon juice, but I didn't bother adding either, as it tasted so damn good as is. The thing I find deceptive about cream cheese treats, is they don't really taste sweet to me, which makes them incredibly easy to eat. I frequently had to get a new spoon, as I kept licking the one I was working with. With normal buttecream or marshmallow buttercream, I freeze any leftovers and make it into candies. The leftovers for this cream cheese frosting all went into my mouth. I was not shy about eating it at all.


I made some simple carrot decorations for the top of the cake, using ziploc bags to pipe on the frosting.

This cake was very yummy, and I love the three layers. I think it looks lovely.


Posted by Jen B On Monday, March 02, 2015 7 comments
We've been making homemade tortillas for a while now, and we absolutely love them. They are cheaper than store bought (about $0.44 for 12 vs. $3.00+ for 10), and they taste amazing. Every time. Sometimes we've made them and I've rolled them too thin, and then they cooked too long, making them crispy instead of soft...and they were still amazing. Hard to roll stuff up in them, but they were great for dipping and snacking.

The recipe I use for my tortillas comes from this blog, which has a really great tutorial. I only have slight changes in my method, but otherwise pretty much the same. So happy I found it, as we make these all the time.

Ingredients:
3 cups all purpose flour
1 tsp salt
1/2 tsp baking powder
1/3 cup canola oil
1 cup hot tap water

Add flour, salt, and baking powder to large bowl and combine with a whisk. I love using a whisk to combine dry ingredients as it's so efficient. For this recipe, I use a giant silver bowl my Mom gave me and it works great.

Add 1/3 cup canola oil to flour mixture.


Mix with your fingers until it becomes fine crumbs.


Add 1 cup hot tap water.


Mix with your hands and form into a ball. Knead the ball 40 times (I just knead it right in the bowl).


Cover with a tea towel, and let rest for 30 minutes. Divide the ball into 12 discs. I do this by weighing the large ball and then making each disc a 12th of the weight. I like to measure because I'm not always great at eyeballing them to be the same size.


Let the 12 discs rest for 30 minutes.


Roll each disc into a tortilla around 8 inches wide. I don't flour my surface because they don't seem to need it. Sometimes they roll out into not quite circles, but they still work as tortillas.


Cook on a hot, ungreased pan for about one minute on each side. The tortillas will have a lot of bubbles when it is time to flip them. We use an electric griddle I got from Mom that works great for cooking two at a time. We turn it up to high and it is perfect.


Serve with a variety of different meals and enjoy. These are served with spicy chick peas and tomatoes on rice, wrapped up with Sriracha, cucumber dressing, fresh spinach, and diced purple onion. Yum!

Posted by Jen B On Monday, February 23, 2015 6 comments
I have been collecting Wilton decorating tips over the past few years, buying them one at a time as I need them/want to play with them. I am building my collection slowly (I currently only have six decorating tips) but the ones I have are ones I use often/look forward to using more often.

These are the most recent additions to my collection and some photos of the fun I've had with them.

1A tip (Large Round).
I bought this one so I could make some hi-hat cupcakes. I definitely want to try the peanut butter ones from this blog, as they look decadent and insane (more icing than cupcake!) but I haven't found an opportunity to make them yet.

Just fooling around with some Marshmallow buttercream, I practiced making some 1A swirls.


2D tip (Drop Flower).

This one is similar to my 1M tip, which is my go to tip for decorating cupcakes. I did some practicing with this one that involved playing with colour as well. I put a few lines of colour on the inside of a piping bag with a toothpick, which gave the edges of the frosting a simple but fancy look.


#233 (Grass tip).
There are a number of different projects I want to try with this tip, from a hobbit hole cake to monsters (Elmo or Cookie). When baseball season comes around again, I'd also love to make a batch of these baseball cupcakes. This was my first go at making grass - I was very happy with it!


My current collection:

Back Row:  1M,   1A,   2D
Front Row:  #21,   #233,   #3


Posted by Jen B On Monday, February 02, 2015 4 comments
I usually buy the 4L bag of milk as it is cheaper than buying cartons (the bag makes it $1/L, the carton is about $2/L or more depending on the size of the carton). The only problem with the 4L bag (16 cups of milk) is that we sometimes don't get through it before the expiry date. The main problem over the past month is that I've cut back on cereal (I was eating it multiple times a day) and I haven't been in the mood for smoothies. This past week I had to use up over a liter of milk so it didn't go to waste. I even drank it (on its own) which I never really do (unless it's chocolate), but I kinda liked it (especially when served with pie!).

To use up 3 cups of milk, I made a chocolate pudding pie, with a recipe from Hershey's website. This pie is egg free and uses corn starch as the thickener. The pie was served with individual helpings of whipped cream and was really delicious.

Posted by Jen B On Friday, January 23, 2015 5 comments
I love making fudge with sweetened condensed milk, and have made several varieties over the past few years. One of the first flavours I tried was Reese's Fudge and I wanted to make it again, but I kept forgetting to pick up Reese's peanut butter cups. At some point I got the bright idea that I could make the peanut butter cups instead of buying them and that is exactly what I did. My sister-in-law has an awesome peanut butter cup recipe and I used it to make peanut butter patties for this recipe. I worked out the difference, and I saved over $3 in peanut butter cups by just making the patties at home. Win!

For the Peanut Butter Patties:
1/3 cup peanut butter
2 tbs + 2 tsp brown sugar
1 tbs margarine
1/3 cup icing sugar

Mix all ingredients together and roll into balls (makes approx. 25 balls). Chill them in the fridge for 3 hours. Remove from fridge and slightly flatten to form patties.


For the Fudge:
3 cups milk chocolate chips
1 can sweetened condensed milk (300 ml)
1 cup chopped peanuts
1 tsp vanilla
25 homemade peanut butter patties

Add chocolate chips and sweetened condensed milk to saucepan over medium heat.


Heat until melted together. Remove from heat and stir in vanilla.


Pour about a 1/4 of the mixture into a prepared 8x8 baking dish. Ensure the bottom is completely covered.

Place peanut butter patties onto the already poured fudge. Then cover them with the rest of the chocolate mixture.


Top with chopped peanuts, pressing gently to adhere to chocolate. Chill in the refrigerator. I always chill my fudge overnight for best results.


Once chilled, cut fudge into pieces for eating and sharing. This one is pretty great for both!


Posted by Jen B On Wednesday, January 21, 2015 5 comments
There were two results from the cookie decorating party with my niece and nephew. The first, was family fun time that produced 25 awesomely decorated cookies.  The second, was that I got super sick with a cold (courtesy of my niece, who has only figured out not to sneeze or cough directly on other people 3 out of every 5 times).

I sent all the cookies home with the kids, so I might have to make some more before the new year. They look like a lot of fun to eat!

Aunt Jenny's cookies:

Earl's cookies:
Liz's cookies:
All the cookies:

Posted by Jen B On Friday, December 26, 2014 4 comments
Related Posts with Thumbnails
  • RSS
  • Delicious
  • Digg
  • Facebook
  • Twitter
  • Linkedin
  • Youtube

My Adorable Twitter

Let's connect!

What I'm Currently Reading

2015 Reading Challenge

2015 Reading Challenge
Jen has read 0 books toward her goal of 30 books.
hide

2014 Reading Challenge

2014 Reading Challenge
Jen has read 0 books toward her goal of 25 books.
hide

2013 Reading Challenge

2013 Reading Challenge
Jen has read 5 books toward a goal of 25 books.
hide

Suggested Reading

Suggested Reading

Good Eating

Active and Outdoorsy